在上一篇文章 中,我们详细讲解了 SparkSQL 如何一步一步地将用户输入的 SQL 语句变为 LogicalPlan 再变为 PhysicalPlan。
在今天的这篇文章中,我们先从 SparkSQL 的 DataFrame Cache 机制开始讲起。
CacheManager 在我之前推荐的那篇论文 中实际上有稍微提到 SparkSQL 的缓存机制。我们都知道 RDD 可以以 Partition 为单位进行缓存,对于一些经常需要大量计算但计算结果基本不变且经常需要查询的数据,我们就会考虑使用 RDD 的缓存机制。SparkSQL 中也是同理。平日的数据库访问中我们经常需要访问一些由两张表 Join 得到的数据。这些数据查询频次高、计算复杂度高,但计算的结果在短时间内是基本不变的。为了做到实时性,对于这样的 DataFrame 我们就可以考虑使用 DataFrame 的 Cache 机制。
通常,我们通过调用 DataFrame 的 cache 方法或 persist 方法来对其进行缓存。实际上这两个操作是完全相同的。我们来看一下它们的源代码:
1
2
3
4
5
6
7
8
9
10
11
12
13
14
15
16
17
18
19
20
21
22
23
class DataFrame private [sql]( @transient val sqlContext: SQLContext , @DeveloperApi @transient val queryExecution: SQLContext #QueryExecution ) extends RDDApi [Row ] with Serializable { override def cache this .type = persist() override def persist this .type = { sqlContext.cacheManager.cacheQuery(this ) this } override def persist StorageLevel ): this .type = { sqlContext.cacheManager.cacheQuery(this , None , newLevel) this } }
那我们再去看看 SQLContext 的这个 cacheManager 是什么:
1 protected [sql] val cacheManager = new CacheManager (this )
由此一来我们就知道这个变量实际上就是个 CacheManager 实例,DataFrame 通过以自己为参数调用它的 cacheQuery 方法来完成缓存动作。那么我们就来看一下 CacheManager:
1 2 3 4 5 6 7 8 9 10 11 12 13 14 15 16 17 18 19 20 21 22 23 24 25 26 27 28 29 30 31 32 33 34 35 36 37 38 39 40 41 42 43 44 45 46 47 48 49 50 51 52 53 54 55 56 57 58 59 60 61 62 63 64 65 66 67 68 69 70 71 72 73 74 75 76 77 78 79 80 81 82 83 84 85 86 87 88 89 90 91 92 93 94 95 96 97 98 99 100 101 102 103 104 105 106 107 108 109 110 111 112 113 114 115 116 117 118 119 120 121 122 123 124 125 126 127 128 129 130 131 132 133 134 135 136 137 138 139 140 141 142 143 144 145 146 147 148 149 150 151 152 153 154 155 156 157 158 private [sql] case class CachedData (plan: LogicalPlan , cachedRepresentation: InMemoryRelation )private [sql] class CacheManager (sqlContext: SQLContext ) extends Logging @transient private val cachedData = new scala.collection.mutable.ArrayBuffer [CachedData ] @transient private val cacheLock = new ReentrantReadWriteLock def isCached String ): Boolean = lookupCachedData(sqlContext.table(tableName)).nonEmpty def cacheTable String ): Unit = cacheQuery(sqlContext.table(tableName), Some (tableName)) def uncacheTable String ): Unit = uncacheQuery(sqlContext.table(tableName)) private def readLock A ](f: => A ): A = { val lock = cacheLock.readLock() lock.lock() try f finally { lock.unlock() } } private def writeLock A ](f: => A ): A = { val lock = cacheLock.writeLock() lock.lock() try f finally { lock.unlock() } } private [sql] def clearCache Unit = writeLock { cachedData.foreach(_.cachedRepresentation.cachedColumnBuffers.unpersist()) cachedData.clear() } private [sql] def isEmpty Boolean = readLock { cachedData.isEmpty } private [sql] def cacheQuery query: DataFrame , tableName: Option [String ] = None , storageLevel: StorageLevel = MEMORY_AND_DISK ): Unit = writeLock { val planToCache = query.queryExecution.analyzed if (lookupCachedData(planToCache).nonEmpty) { logWarning("Asked to cache already cached data." ) } else { cachedData += CachedData ( planToCache, InMemoryRelation ( sqlContext.conf.useCompression, sqlContext.conf.columnBatchSize, storageLevel, query.queryExecution.executedPlan, tableName)) } } private [sql] def uncacheQuery DataFrame , blocking: Boolean = true ): Unit = writeLock { val planToCache = query.queryExecution.analyzed val dataIndex = cachedData.indexWhere(cd => planToCache.sameResult(cd.plan)) require(dataIndex >= 0 , s"Table $query is not cached." ) cachedData(dataIndex).cachedRepresentation.uncache(blocking) cachedData.remove(dataIndex) } private [sql] def tryUncacheQuery query: DataFrame , blocking: Boolean = true ): Boolean = writeLock { val planToCache = query.queryExecution.analyzed val dataIndex = cachedData.indexWhere(cd => planToCache.sameResult(cd.plan)) val found = dataIndex >= 0 if (found) { cachedData(dataIndex).cachedRepresentation.cachedColumnBuffers.unpersist(blocking) cachedData.remove(dataIndex) } found } private [sql] def lookupCachedData DataFrame ): Option [CachedData ] = readLock { lookupCachedData(query.queryExecution.analyzed) } private [sql] def lookupCachedData LogicalPlan ): Option [CachedData ] = readLock { cachedData.find(cd => plan.sameResult(cd.plan)) } private [sql] def useCachedData LogicalPlan ): LogicalPlan = { plan transformDown { case currentFragment => lookupCachedData(currentFragment) .map(_.cachedRepresentation.withOutput(currentFragment.output)) .getOrElse(currentFragment) } } private [sql] def invalidateCache LogicalPlan ): Unit = writeLock { cachedData.foreach { case data if data.plan.collect { case p if p.sameResult(plan) => p }.nonEmpty => data.cachedRepresentation.recache() case _ => } } }
经过一番阅读,我们了解到,SparkSQL 通过对 Analyzed Logical Plan 调用 useCachedData 方法,便会将执行计划树中与某个已缓存数据相吻合的子树替换为一个 InMemoryRelation。我们之前就接触过 Relation,它主要指的是 SQL 中 FROM 关键字指明的表名,所以这里的 InMemoryRelation 也可以理解为直接从内存中 SELECT FROM。在注册缓存时,CacheManager 利用了一些设置参数、表名、DataFrame 的 Physical Plan 来实例化一个 InMemoryRelation。
InMemoryRelation 那我们就来看一下这个 InMemoryRelation:
1
2
3
4
5
6
7
8
9
10
11
12
13
14
15
16
17
18
19
20
21
22
23
24
25
26
27
28
29
30
31
32
33
34
35
36
37
38
39
40
41
42
43
44
45
46
47
48
49
50
51
52
53
54
55
56
57
58
59
60
61
62
63
64
65
66
67
68
69
70
71
72
73
74
75
76
77
78
79
80
81
82
83
84
85
86
87
88
89
90
91
92
93
94
95
96
97
98
99
100
101
102
103
104
105
106
107
108
109
110
111
112
113
114
115
116
117
118
119
120
121
122
123
124
125
126
127
128
129
130
131
132
133
134
135
136
137
138
139
140
141
142
143
144
145
146
147
148
149
150
151
152
153
154
155
156
157
158
159
160
161
162
163
164
165
166
167
168
169
170
171
172
173
174
175
176
177
178
179
180
181
182
183
184
private [sql] object InMemoryRelation def apply useCompression: Boolean , batchSize: Int , storageLevel: StorageLevel , child: SparkPlan , tableName: Option [String ]): InMemoryRelation = new InMemoryRelation (child.output, useCompression, batchSize, storageLevel, child, tableName)() } private [sql] case class CachedBatch (buffers: Array [Array [Byte ]], stats: Row )private [sql] case class InMemoryRelation ( output: Seq [Attribute ], useCompression: Boolean , batchSize: Int , storageLevel: StorageLevel , child: SparkPlan , tableName: Option [String ] )( // 注意这里有个 CachedBatch 的 RDD ,这个应该就是指这张表的缓存数据 private var _cachedColumnBuffers: RDD [CachedBatch ] = null, private var _statistics: Statistics = null, private var _batchStats: Accumulable [ArrayBuffer [Row ], Row ] = null ) extends LogicalPlan with MultiInstanceRelation { private val batchStats: Accumulable [ArrayBuffer [Row ], Row ] = if (_batchStats == null ) { child.sqlContext.sparkContext.accumulableCollection(ArrayBuffer .empty[Row ]) } else { _batchStats } val partitionStatistics = new PartitionStatistics (output) private def computeSizeInBytes val sizeOfRow: Expression = BindReferences .bindReference( output.map(a => partitionStatistics.forAttribute(a).sizeInBytes).reduce(Add ), partitionStatistics.schema) batchStats.value.map(row => sizeOfRow.eval(row).asInstanceOf[Long ]).sum } private def statisticsToBePropagated if (_statistics == null ) { val updatedStats = statistics if (_statistics == null ) null else updatedStats } else { _statistics } override def statistics Statistics = { if (_statistics == null ) { if (batchStats.value.isEmpty) { Statistics (sizeInBytes = child.sqlContext.conf.defaultSizeInBytes) } else { _statistics = Statistics (sizeInBytes = computeSizeInBytes) _statistics } } else { _statistics } } if (_cachedColumnBuffers == null ) { buildBuffers() } def recache Unit = { _cachedColumnBuffers.unpersist() _cachedColumnBuffers = null buildBuffers() } private def buildBuffers Unit = { val output = child.output val cached = child.execute().mapPartitions { rowIterator => new Iterator [CachedBatch ] { def next CachedBatch = { val columnBuilders = output.map { attribute => val columnType = ColumnType (attribute.dataType) val initialBufferSize = columnType.defaultSize * batchSize ColumnBuilder (attribute.dataType, initialBufferSize, attribute.name, useCompression) }.toArray var rowCount = 0 while (rowIterator.hasNext && rowCount < batchSize) { val row = rowIterator.next() var i = 0 while (i < row.length) { columnBuilders(i).appendFrom(row, i) i += 1 } rowCount += 1 } val stats = Row .merge(columnBuilders.map(_.columnStats.collectedStatistics) : _*) batchStats += stats CachedBatch (columnBuilders.map(_.build().array()), stats) } def hasNext Boolean = rowIterator.hasNext } }.persist(storageLevel) cached.setName(tableName.map(n => s"In-memory table $n " ).getOrElse(child.toString)) _cachedColumnBuffers = cached } def withOutput Seq [Attribute ]): InMemoryRelation = { InMemoryRelation ( newOutput, useCompression, batchSize, storageLevel, child, tableName)( _cachedColumnBuffers, statisticsToBePropagated, batchStats) } override def children Seq [LogicalPlan ] = Seq .empty override def newInstance this .type = { new InMemoryRelation ( output.map(_.newInstance()), useCompression, batchSize, storageLevel, child, tableName)( _cachedColumnBuffers, statisticsToBePropagated, batchStats).asInstanceOf[this .type ] } def cachedColumnBuffers RDD [CachedBatch ] = _cachedColumnBuffers override protected def otherCopyArgs Seq [AnyRef ] = Seq (_cachedColumnBuffers, statisticsToBePropagated, batchStats) private [sql] def uncache Boolean ): Unit = { Accumulators .remove(batchStats.id) cachedColumnBuffers.unpersist(blocking) _cachedColumnBuffers = null } }
目前来讲,我们已经能看懂大部分的代码。其中出现了一个 ColumnBuilder,正是用来构建列缓存的类。那我们去看看这个 ColumnBuilder:
1 2 3 4 5 6 7 8 9 10 11 12 13 14 private [sql] trait ColumnBuilder def initialize Int , columnName: String = "" , useCompression: Boolean = false ) def appendFrom Row , ordinal: Int ) def columnStats ColumnStats def build ByteBuffer }
我们先不着急看它的实现类,我们先去看看它的实例化方法:
1
2
3
4
5
6
7
8
9
10
11
12
13
14
15
16
17
18
19
20
21
22
23
24
25
26
27
28
29
30
31
32
33
34
35
36
37
38
39
40
41
42
43
44
45
46
47
48
49
50
51
52
private [sql] object ColumnBuilder val DEFAULT_INITIAL_BUFFER_SIZE = 1024 * 1024 private [columnar] def ensureFreeSpace ByteBuffer , size: Int ) = { if (orig.remaining >= size) { orig } else { val capacity = orig.capacity() val newSize = capacity + size.max(capacity / 8 + 1 ) val pos = orig.position() ByteBuffer .allocate(newSize) .order(ByteOrder .nativeOrder()) .put(orig.array(), 0 , pos) } } def apply dataType: DataType , initialSize: Int = 0 , columnName: String = "" , useCompression: Boolean = false ): ColumnBuilder = { val builder: ColumnBuilder = dataType match { case IntegerType => new IntColumnBuilder case LongType => new LongColumnBuilder case FloatType => new FloatColumnBuilder case DoubleType => new DoubleColumnBuilder case BooleanType => new BooleanColumnBuilder case ByteType => new ByteColumnBuilder case ShortType => new ShortColumnBuilder case StringType => new StringColumnBuilder case BinaryType => new BinaryColumnBuilder case DateType => new DateColumnBuilder case TimestampType => new TimestampColumnBuilder case DecimalType .Fixed (precision, scale) if precision < 19 => new FixedDecimalColumnBuilder (precision, scale) case _ => new GenericColumnBuilder } builder.initialize(initialSize, columnName, useCompression) builder } }
由此看来,ColumnBuilder 的工作是构建一个列缓存,但列缓存本身由一个 ByteBuffer 表示,所以 build 方法返回的是一个 ByteBuffer。ByteBuffer 实际上是一个抽象类,它来自 java.nio 包。通过调用 ByteBuffer 的静态方法来获取其子类实例可以让外部调用者不去在意其底部的内存分配方式。
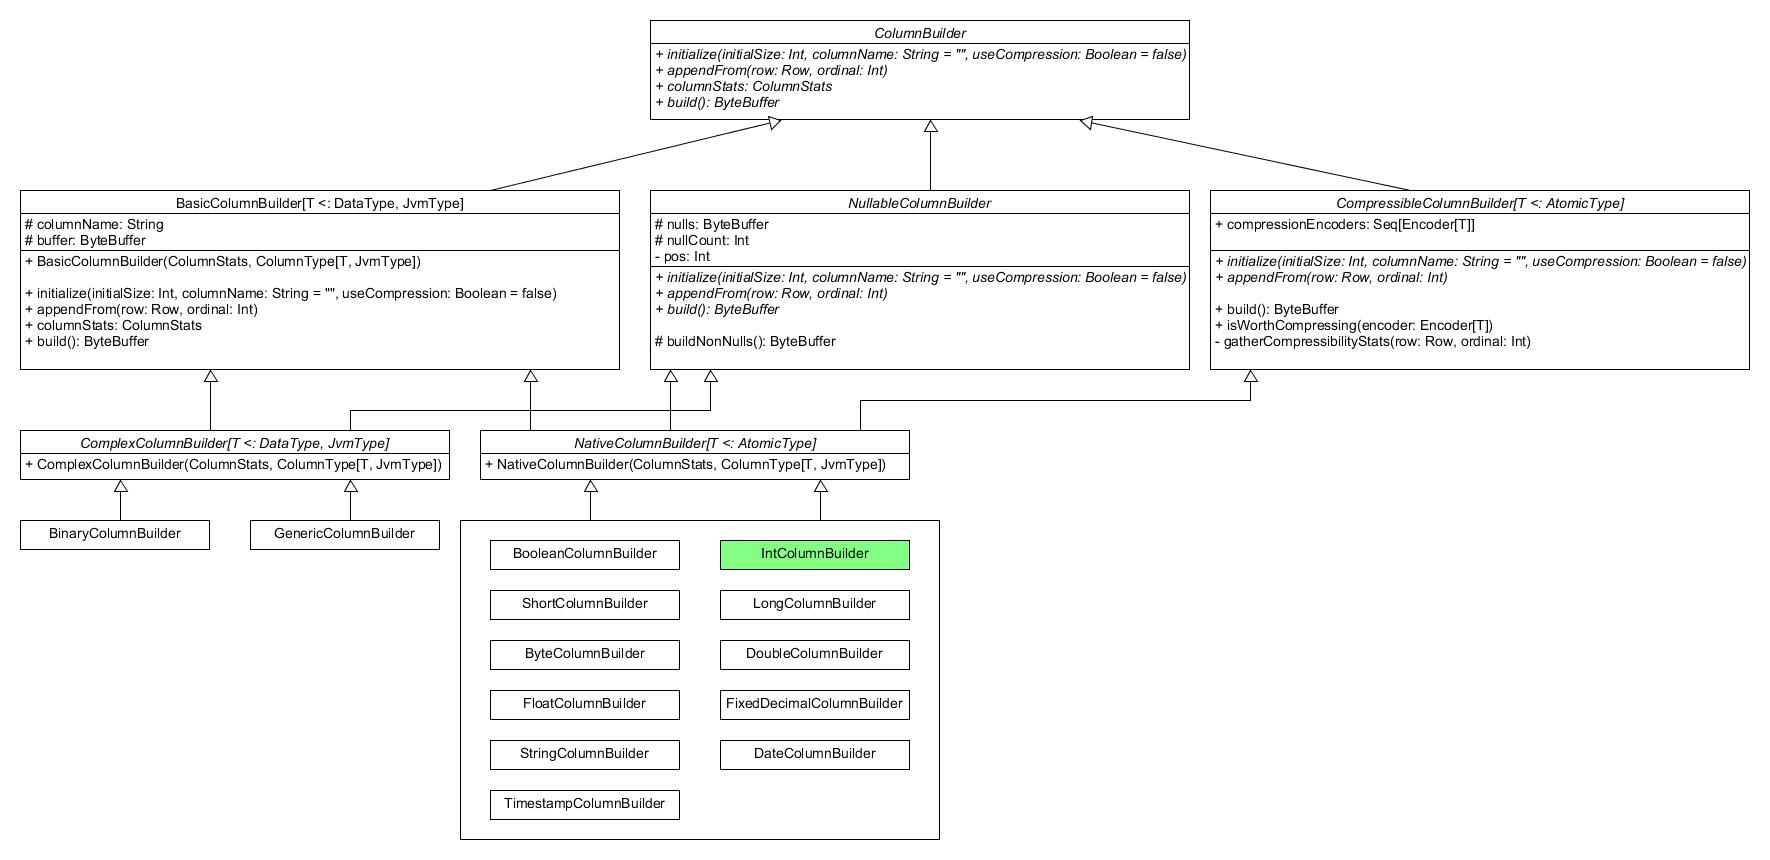
实际上,ColumnBuilder 的子类们有着极为复杂的继承关系。画成类图大致如下:
由此看来,我们最好不要再往下深究。
除了 ColumnBuilder,我们还需要关注出现在 InMemoryRelation 中的 PartitionStatistics。我们来看看它的代码:
1 2 3 4 5 6 7 8 9 10 11 12 13 14 15 16 17 18 19 20 21 22 23 24 25 26 27 private [sql] class PartitionStatistics (tableSchema: Seq [Attribute ] ) extends Serializable val (forAttribute, schema) = { val allStats = tableSchema.map(a => a -> new ColumnStatisticsSchema (a)) (AttributeMap (allStats), allStats.map(_._2.schema).foldLeft(Seq .empty[Attribute ])(_ ++ _)) } } private [sql] class ColumnStatisticsSchema (a: Attribute ) extends Serializable val upperBound = AttributeReference (a.name + ".upperBound" , a.dataType, nullable = true )() val lowerBound = AttributeReference (a.name + ".lowerBound" , a.dataType, nullable = true )() val nullCount = AttributeReference (a.name + ".nullCount" , IntegerType , nullable = false )() val count = AttributeReference (a.name + ".count" , IntegerType , nullable = false )() val sizeInBytes = AttributeReference (a.name + ".sizeInBytes" , LongType , nullable = false )() val schema = Seq (lowerBound, upperBound, nullCount, count, sizeInBytes) }
这里只能看出,PartitionStatistics 倒是做了个很奇怪的工作,而且 InMemoryRelation 再没用到过它。也许后面会有什么地方用到它。
至此,我们就知道,在实例化 InMemoryRelation 的时候就已经完成了 RDD.persist 的动作,但我们也要知道 RDD 的缓存本身是 lazy 的,即使调用了这个 persist 方法,真正的缓存动作是还没有执行的。
接下来我们开始看看 SparkSQL 会如何获取这些缓存数据。
InMemoryColumnarTableScan 之前我们学习到,Optimized Logical Plan 由 SparkPlanner 转变为 Physical Plan,而 SparkPlanner 所应用的转换策略都位于 SparkStrategies 中。
1 2 3 4 5 6 7 8 9 10 11 12 13 object InMemoryScans extends Strategy def apply LogicalPlan ): Seq [SparkPlan ] = plan match { case PhysicalOperation (projectList, filters, mem: InMemoryRelation ) => pruneFilterProject( projectList, filters, identity[Seq [Expression ]], InMemoryColumnarTableScan (_, filters, mem)) :: Nil case _ => Nil } }
那我们先去看看这个 PhysicalOperation:
1
2
3
4
5
6
7
8
9
10
11
12
13
14
15
16
17
18
19
20
21
22
23
24
25
26
27
28
29
30
31
32
33
object PhysicalOperation extends PredicateHelper type ReturnType Seq [NamedExpression ], Seq [Expression ], LogicalPlan ) def unapply LogicalPlan ): Option [ReturnType ] = { val (fields, filters, child, _) = collectProjectsAndFilters(plan) Some ((fields.getOrElse(child.output), filters, child)) } def collectProjectsAndFilters LogicalPlan ): (Option [Seq [NamedExpression ]], Seq [Expression ], LogicalPlan , Map [Attribute , Expression ]) = plan match { case Project (fields, child) => val (_, filters, other, aliases) = collectProjectsAndFilters(child) val substitutedFields = fields.map(substitute(aliases)).asInstanceOf[Seq [NamedExpression ]] (Some (substitutedFields), filters, other, collectAliases(substitutedFields)) case Filter (condition, child) => val (fields, filters, other, aliases) = collectProjectsAndFilters(child) val substitutedCondition = substitute(aliases)(condition) (fields, filters ++ splitConjunctivePredicates(substitutedCondition), other, aliases) case other => (None , Nil , other, Map .empty) } }
那么回到刚才的 Strategy:
1
2
3
4
5
6
7
8
9
10
11
12
13
object InMemoryScans extends Strategy def apply LogicalPlan ): Seq [SparkPlan ] = plan match { case PhysicalOperation (projectList, filters, mem: InMemoryRelation ) => pruneFilterProject( projectList, filters, identity[Seq [Expression ]], InMemoryColumnarTableScan (_, filters, mem)) :: Nil case _ => Nil } }
这下好像找到点眉头了。那么我们来看一下这个 InMemoryColumnarTableScan:
1
2
3
4
5
6
7
8
9
10
11
12
13
14
15
16
17
18
19
20
21
22
23
24
25
26
27
28
29
30
31
32
33
34
35
36
37
38
39
40
41
42
43
44
45
46
47
48
49
50
51
52
53
54
55
56
57
58
59
60
61
62
63
64
65
66
67
68
69
70
71
72
73
74
75
76
77
78
79
80
81
82
83
84
85
86
87
88
89
90
91
92
93
94
95
96
97
98
99
100
101
102
103
104
private [sql] case class InMemoryColumnarTableScan ( attributes: Seq [Attribute ], predicates: Seq [Expression ], relation: InMemoryRelation ) extends LeafNode { override def output Seq [Attribute ] = attributes private def statsFor Attribute ) = relation.partitionStatistics.forAttribute(a) protected override def doExecute RDD [Row ] = { relation.cachedColumnBuffers.mapPartitions { cachedBatchIterator => val (requestedColumnIndices, requestedColumnDataTypes) = if (attributes.isEmpty) { val (narrowestOrdinal, narrowestDataType) = relation.output.zipWithIndex.map { case (a, ordinal) => ordinal -> a.dataType } minBy { case (_, dataType) => ColumnType (dataType).defaultSize } Seq (narrowestOrdinal) -> Seq (narrowestDataType) } else { attributes.map { a => relation.output.indexWhere(_.exprId == a.exprId) -> a.dataType }.unzip } val nextRow = new SpecificMutableRow (requestedColumnDataTypes) def cachedBatchesToRows Iterator [CachedBatch ]): Iterator [Row ] = { val rows = cacheBatches.flatMap { cachedBatch => val columnAccessors = requestedColumnIndices.map { batchColumnIndex => ColumnAccessor ( relation.output(batchColumnIndex).dataType, ByteBuffer .wrap(cachedBatch.buffers(batchColumnIndex))) } new Iterator [Row ] { private [this ] val rowLen = nextRow.length override def next Row = { var i = 0 while (i < rowLen) { columnAccessors(i).extractTo(nextRow, i) i += 1 } if (attributes.isEmpty) Row .empty else nextRow } override def hasNext Boolean = columnAccessors(0 ).hasNext } } if (rows.hasNext && enableAccumulators) { readPartitions += 1 } rows } val cachedBatchesToScan = if (inMemoryPartitionPruningEnabled) { cachedBatchIterator.filter { cachedBatch => if (!partitionFilter(cachedBatch.stats)) { def statsString String = relation.partitionStatistics.schema .zip(cachedBatch.stats.toSeq) .map { case (a, s) => s"${a.name} : $s " } .mkString(", " ) logInfo(s"Skipping partition based on stats $statsString " ) false } else { if (enableAccumulators) { readBatches += 1 } true } } } else { cachedBatchIterator } cachedBatchesToRows(cachedBatchesToScan) } } }
至此其实我们就全部理解了。